Discourse is a popular forum software written in Ruby. Because Discourse relies on Docker, which is incompatible with the platform, installation must be carried out manually. A Pro package is recommended to run Discourse as each worker is approximately 200 MB.
Getting Started
Installation is done within the Terminal.
- Checkout the Discourse repository from GitHub into /var/www
cd /var/www git clone https://github.com/discourse/discourse.git cd discourse - Verify the Ruby interpreter is at least 2.3.1. Switch interpreters if not.
rvm list # Look that at least ruby-2.3.1 is the current interpreter rvm use 2.4.1- Optionally designate the Ruby version as your default Ruby interpreter for the directory:
echo 2.4.1 > .ruby-version
- Optionally designate the Ruby version as your default Ruby interpreter for the directory:
- Install Bundle and application dependencies:
gem install bundle bundle install- Note: depending upon platform, the build process will fail on the pg gem. Set the pg build configuration, then rerun
bundle installto continue installation (v7 uses PostgreSQL 9.6, v6.5 9.4, and v6 9.1):bundle config build.pg --with-pg-config=/usr/pgsql-9.6/bin/pg_config
- Note: depending upon platform, the build process will fail on the pg gem. Set the pg build configuration, then rerun
- Setup Redis
- Create a PostgreSQL database (Databases > PostgreSQL Manager). Be sure to bump the user designated to connect to the database from the system default 5 to 15 concurrent connections. Discourse pools its connections and requires a higher allowance.
- Create a new user to relay email for Discourse via User > Add User. Ensure that the user has email privileges (incoming, outgoing) enabled.
- Copy
config/discourse_defaults.conftoconfig/discourse.conf, this will provide application-specific overridescp config/discourse_defaults.conf config/discourse.conf - Change the following
config/discourse.confvalues to match what is on your account: db_pool (set to5), developer_emails, db_name, db_host (set to127.0.0.1), db_username, db_password, hostname, smtp_address (set tolocalhost), smtp_user_name, smtp_password, smtp_openssl_verify_mode (set tonone), redis_port- developer_emails is a comma-delimited list of users that register who are conferred admin rights
- Populate the database:
RAILS_ENV=production bundle exec rake db:migrate- Migration will fail requiring the hstore, pg_trgm extensions. Open a ticket in the panel to request hstore and pg_trgm to be added to your PostgreSQL database (also include the database name). Alternatively, use Beacon to call sql_add_pgsql_extension. Both “pg_trgm” and “hstore” are supported.
- Precompile assets:
RAILS_ENV=production bundle exec rake assets:precompile - Create an upload storage directory under
public/mkdir public/uploads - Dispatch Sidekiq, which handles tasks for Discourse, including sending email
RAILS_ENV=production rvm 2.4.1 do sidekiq -L /tmp/sidekiq.log -P /tmp/sidekiq.pid -q critical -q low -q default -d - Populate initial posts
RAILS_ENV=production bundle exec rake posts:rebake
- Setup Passenger to serve the application:
gem install --no-rdoc --no-ri passenger passenger-config --ruby-command- Add
RailsEnv productionto your .htaccess control underpublic/ - Add PassengerRuby directive to your .htaccess control under
public/, e.g.
PassengerRuby /home/apnscp/.rvm/gems/ruby-2.4.0/wrappers/ruby
- Add
- Lastly, connect
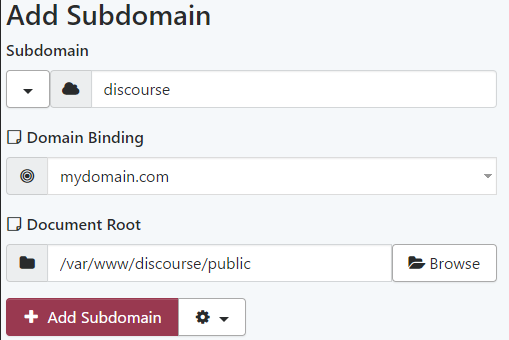
discourse/publicto a subdomain or addon domain.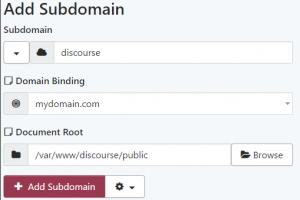
Connecting Discourse to a subdomain named discourse.mydomain.com
- Visit your new Discourse forum. Register using your email address specified in
developer_emails. A confirmation email will be sent if all is configured correct (smtp* settings) and Sidekiq is running. Click the link and follow the setup instructions!Note: adding a CDN in the following section is highly recommended
Adding CDN
Without a CDN, Discourse will serve all content through its application, which creates significant overhead. Placing a CDN in front of the static assets will allow a third-party to cache and send static content thus speeding up Discourse significantly.
Any CDN will work. Amazon CloudFront offers 50 GB free and will be used for this example.
Given Discourse runs on discourse.mydomain.com and the CDN will be called cdn.mydomain.com:
- Add a CORS header to
public/.htaccess:Header set Access-Control-Allow-Origin "http://discourse.mydomain.com"
- In CloudFront, click Create Distribution
- Select Web
- Under Origin Domain Name, enter discourse.mydomain.com
- Under Origin ID, enter cdn.mydomain.com
- Under Alternative Domain Names (CNAMEs), specify cdn.mydomain.com
- Under Forward Headers, select Whitelist
- Whitelist Headers is now accessible. Under the header list, select Origin. Click Add >>.
- Visit DNS > DNS Manager. Create a new CNAME record for cdn.mydomain.com.
- Select CNAME as RR.
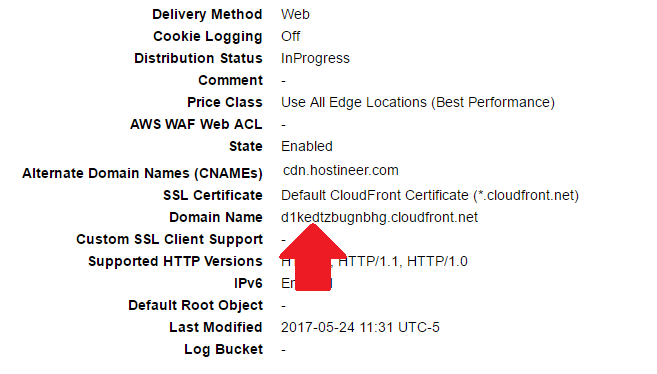
- Enter the CloudFront Domain Name as your parameter.
- Click Add

CloudFront domain field
- Edit
config/discourse.conf. Change cdn_url - Restart Discourse
touch tmp/restart.txt